
Property Styling Checklist: Is It Worth It When Selling
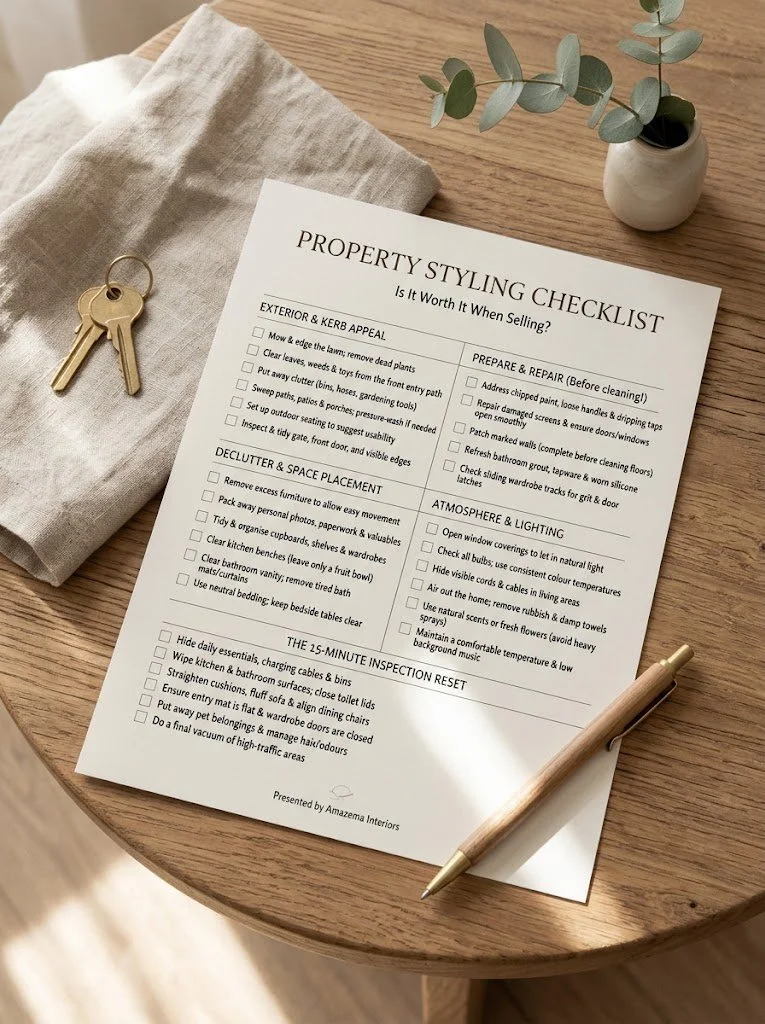
Yes, property styling can be worthwhile when it helps buyers connect with your home and see how its rooms could work for them. For Sydney sellers, from the Northern Beaches to the North Shore, a property styling checklist for sellers helps you prioritise repairs, cleaning and the details that shape a first impression. The aim is not to disguise your home, but to present it with care.
It’s understandable to wonder whether styling will make a difference, especially when you’re balancing the sale with the practicalities of preparing your home. Thoughtful presentation can strengthen marketing photos and help a property feel ready to move into, but the right approach depends on the home’s condition, character and likely buyers.
This guide offers a practical plan for assessing your property before sale, prioritising repairs, coordinating cleaning and styling, and preparing for photography and inspections. You’ll also learn when professional styling may help, and when decluttering and a thorough clean could be enough. Start with what buyers will notice first, then add the details that make each room feel welcoming.
Key Takeaways
Decide whether styling suits your home by considering its condition, character and the impression buyers will get from the listing photos.
Plan repairs and furniture moves before the main clean, then leave final presentation touches until the dust has settled.
Use natural light, working fixtures and fresh air to make rooms feel welcoming, without relying on strong fragrances.
For a lived-in home, clear surfaces and walkways, organise storage and prepare a simple reset routine before each inspection.
Assess each room from a buyer’s perspective, prioritise work that supports the sales campaign and avoid using cosmetic changes to conceal defects.
Table of Contents
Is property styling worth it when selling a home?
Property styling can be worthwhile when it helps buyers understand a home’s layout, light and potential. In Sydney, from Manly and Avalon to Mosman and Lane Cove, outdoor presentation shapes the first impression before buyers enter. Mow the lawn, clear garden debris, put bins and tools away, and sweep paths and patios.
Think of styling as a way to help buyers understand the home, not decoration for its own sake. A living room arranged for conversation shows how the space might work; a clear walkway makes movement feel easy. Considered furniture placement in listing photos can show room proportions and help online viewers picture daily life.
Check the entry from the street. Clear leaves, weeds and children’s toys from the path so the front door is easy to see.
Refresh the lawn and garden beds. Mow, edge the beds and remove dead plants to make outdoor areas look maintained.
Put away practical clutter. Move bins, hoses, gardening tools and sports gear out of sight before photos and inspections.
Clean the hard surfaces. Sweep paths, patios and the front porch; pressure-wash dirty areas where appropriate.
Make outdoor spaces legible. Arrange usable outdoor furniture to suggest a place to sit, rather than leaving it scattered.
Look at the home from the kerb. Check the gate, front door, windows and visible garden edges for marks or tired details.
Consider what the listing photos need to communicate. Buyers often see a property online before visiting, so clear views of each room matter. Remove anything that blocks windows or makes a room’s purpose difficult to understand. Keep furniture in proportion: bulky pieces can crowd a compact room, while a few well-placed items show its scale and function.
Natural light also shapes a first impression. Open window coverings, clean the glass and make sure outdoor furniture or overgrown plants aren’t blocking the view. For a Northern Beaches balcony or courtyard, sweep the floor and remove tired or broken items. Show the connection between indoors and outdoors, especially where living areas open onto a garden or entertaining space.
Styling works best when it responds to a property’s character. In a beachside cottage around Collaroy or Newport, a relaxed presentation can complement timber details and garden views. In a Federation home on the Lower North Shore, preserve distinctive features and choose furniture that suits the room’s proportions. Avoid pieces that hide wear or distract from the home’s character.
Use this property styling checklist for sellers to prioritise visible, practical improvements before photography. Styling supports presentation; it doesn’t replace repairs or a proper clean. When the exterior looks cared for and each room’s purpose is clear, buyers can focus on the home’s possibilities rather than what needs attention.
Coordinating cleaning with repairs and furniture moves
Yes, sale preparation can involve state or territory requirements, including smoke-alarm and safety obligations. Treat these as separate compliance tasks, not styling choices, and don’t use cosmetic work to conceal a defect.
Prioritise the living areas, kitchen, main bedroom and outdoor entertaining area. In a Northern Beaches home, plan furniture moves around narrow hallways or stairs to keep access clear. For a Lower North Shore apartment, consider lift access and shared entryways when arranging cleaning and removals.
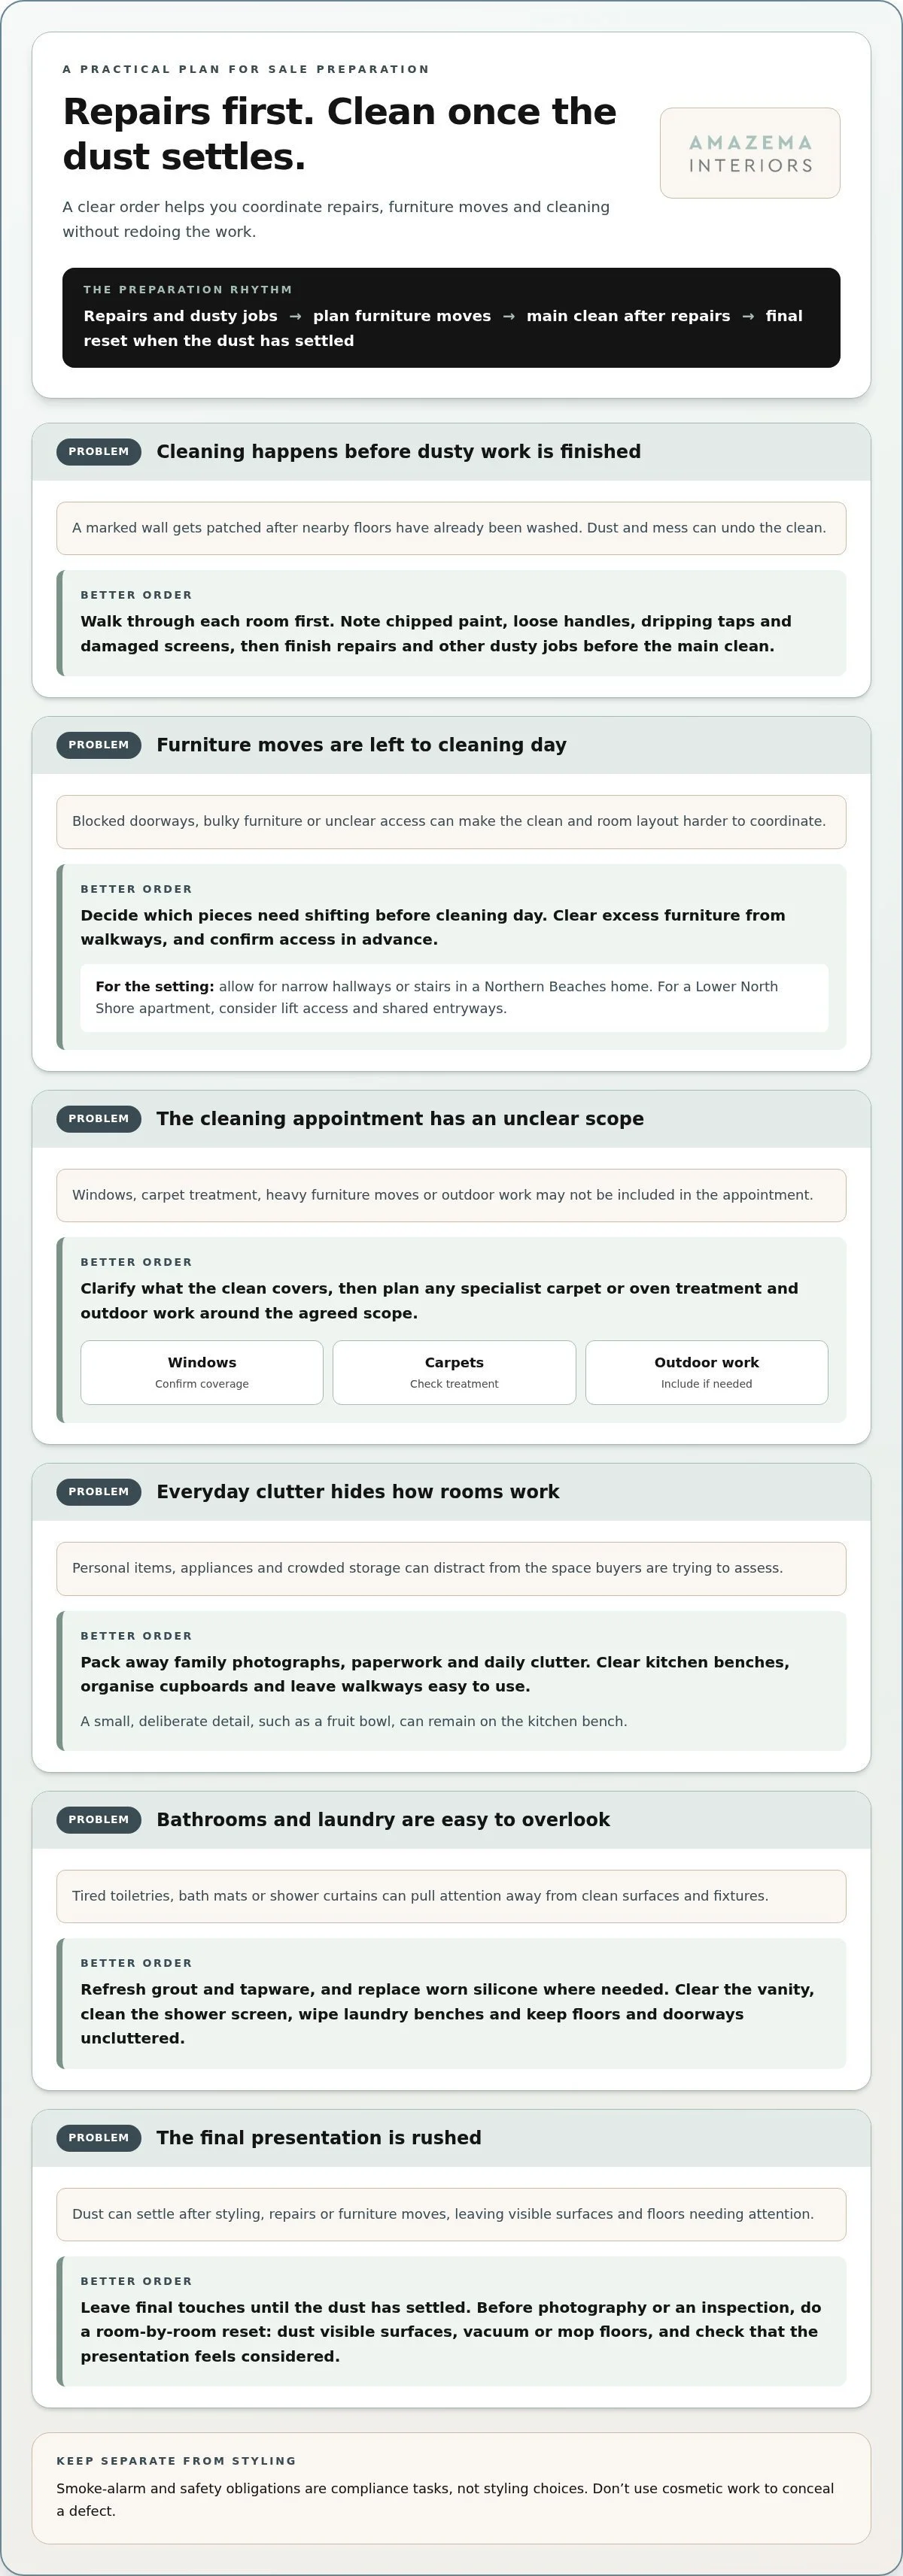
Work in sequence. Finish repairs and other dusty jobs before the main clean, then move furniture and style the rooms. Leave final touches until the dust has settled. For example, patch a marked wall before washing nearby floors, not after the cleaner has finished.
Walk through each room. Note chipped paint, loose handles, dripping taps and damaged screens before arranging furniture.
Remove excess furniture. Clear pieces that block doorways or make a living area difficult to move through.
Pack away personal items. Store family photographs, paperwork and daily clutter so buyers can focus on the rooms.
Clear kitchen benches. Put appliances and food away, leaving a small, deliberate detail such as a fruit bowl.
Organise cupboards and storage. Tidy shelves so buyers can see how the available space works.
Schedule the main clean after repairs. Include floors, windows and surfaces affected by dust.
Plan furniture moves before cleaning day. Confirm access and decide which pieces need shifting, rather than assuming the cleaner will move them.
In the bathroom, refresh grout and tapware, and replace worn silicone where needed. Remove toiletries, bath mats and shower curtains if they look tired. A clear vanity and clean shower screen make the room easier to assess. In the laundry, wipe benches, clean the sink and keep the floor and doorway uncluttered.
Arrange a deep clean for kitchens and bathrooms, then give windows, mirrors and floors particular attention. If carpets or ovens need specialist treatment, include them in the schedule. Clarify what the cleaning appointment covers, especially windows, carpet treatment, heavy furniture moves and outdoor work. The scope affects how you plan the final presentation.
Before photography or an inspection, do a final room-by-room reset. Dust visible surfaces, vacuum or mop floors, make beds and return essential furniture to its intended position. Check that cupboards, doors and windows open smoothly, and keep exits and accessways clear. These last checks help the home feel cared for, without letting freshly arranged cushions distract from a tap that still drips.
Lighting, ventilation and sensory details
For Australian homes, warm whites, soft off-whites and gentle greiges are versatile neutral paint choices. Compare a paint sample with your flooring and fixed finishes in daylight and evening light. Pair it with working lamps, uncluttered surfaces and furniture scaled to each room.
Light shapes how buyers experience a home as they walk through. Open curtains and blinds before a daytime inspection, then switch on lights in darker corners. A bright kitchen feels more welcoming when its bench is clear and pendant lights work. In a narrow hallway, a mirror can reflect available daylight without taking up floor space.
Open window coverings. Let natural light reach the room, and make sure curtains or blinds move smoothly.
Check every bulb. Replace blown bulbs and use a consistent colour temperature in each room.
Layer the lighting. Combine ceiling lights with a lamp beside a reading chair or sofa.
Position mirrors thoughtfully. Reflect a window or a pleasant view, not clutter or a blank wall.
Hide visible cords. Clear cables from living-room floors and surfaces before photography.
Paint needs the same attention to light. A white that looks crisp in a sunlit room may feel stark in a shaded one. Test a small sample beside existing tiles, timber and stone, then view it at different times of day. If repainting isn’t needed, clean marked walls and let the current finish sit quietly with the furnishings.
Fresh air matters more than a strong fragrance. Air out the home before visitors arrive, and remove rubbish or damp towels that can hold lingering odours. Skip heavy air fresheners, which can overwhelm an enclosed room. A vase of fresh flowers or a light, natural scent can add a gentle finishing touch without competing for attention.
Sound and temperature also shape a walkthrough. Keep background music low enough for conversation, and set the home to a comfortable temperature before the inspection. Close windows if outdoor noise distracts from a quiet room, or open them when fresh air and a garden outlook are part of the home’s appeal.
Keep sensory details consistent from room to room. A warm bedside lamp, neutral bedding and clear bedside tables can make a main bedroom feel restful. In a living room, arrange furniture so visitors can move easily and see the windows. Remove small clutter that interrupts sightlines, but leave a few considered pieces to give the space warmth and scale.
Before photos or an open home, walk through from the entry. Notice dark corners, blocked windows, visible cords and strong scents. Address those details first. The result should feel natural, inviting and true to the home, not like a set built to hold attention.
Can sellers prepare a lived-in property for inspections?
Yes. You can prepare a lived-in home by reducing visible clutter, organising daily essentials and resetting key rooms before each inspection. Professional styling is tailored to the property, the rooms involved and whether furniture and decorative items are needed. Amazema offers Bespoke Style for occupied homes, incorporating existing furniture where it suits the space, so there’s no need to move out.
Start planning before the listing photographs are booked. Complete repairs and decluttering first, then arrange styling and cleaning around the photography date. This gives you time to make changes without rushing the presentation or moving furniture twice.
Living areas: Arrange seating to define conversation, and remove bulky pieces that interrupt movement.
Kitchen: Clear benchtops, leaving only a considered detail such as a fruit bowl.
Bathroom: Put toiletries away, hang fresh towels and clear the vanity.
Main bedroom: Make the bed with neutral linen, and remove bulky furniture if it crowds the room.
Wardrobes: Reduce visible contents so buyers can see the available storage.
Personal items: Store family photographs, documents and valuables before photography and inspections.
For photo day, prepare the home as though buyers will see every detail in close-up. Check that window coverings open smoothly, straighten rugs and make beds. Secure medication, personal paperwork and identifying details that shouldn’t appear in a public listing. Keep doors, exits and access points clear while packing.
Before publishing the listing, review the property photographs with your agent. Keep the original images and discuss proposed edits before publication. Virtual staging can show furniture and decor that aren’t physically in an empty room, so make sure the listing presentation doesn’t mislead buyers about the property’s condition.
On inspection day, give yourself time for a final reset. Put away washing, clear kitchen and bathroom surfaces, vacuum high-traffic areas and remove rubbish bins from sight. Straighten cushions, fluff sofa seats and check that decorative items haven’t drifted out of place. If you have pets, put them and their belongings away, then remove visible hair and lingering odours.
Keep the presentation consistent between photographs and open homes. Buyers should recognise the same clear layout and sense of space when they arrive. Match the listing’s styling with practical upkeep, so the home feels welcoming and its actual condition remains easy to understand.
Planning and assessing the property before sale
Start with a buyer’s-eye walk-through before booking repairs or choosing furniture. Enter through the front door, then note what each room communicates, where movement feels awkward and which features deserve attention. A kitchen bench crowded with appliances, for example, may need clearing before you consider replacing anything.
Build a practical scope around the sales campaign. Separate essential repairs, presentation tasks and optional improvements, then consider how each job affects the next. Dust-producing work belongs before deep cleaning; furniture placement comes after access is clear. This sequence helps you avoid redoing finished work.
Record visible defects. List cracked tiles, loose handles, leaking taps and damaged screens so repairs aren’t mistaken for styling.
Assess each room’s purpose. Decide whether an awkward spare room should read as a study, guest room or flexible living space.
Check circulation and access. Walk from the entry to the living area, kitchen and outdoor doors, noting furniture that blocks movement.
Review light and window coverings. Open curtains and blinds to see whether natural light reaches the room and whether coverings work smoothly.
Choose improvements with care. Compare the likely presentation benefit with the disruption, time and work involved.
Set a completion point. Schedule each job before photography, allowing the property to be cleaned and checked afterwards.
Look at the home as a whole, not as a collection of isolated rooms. A neutral palette can help adjoining spaces feel connected, but it shouldn’t erase the character of a Federation home or mid-century details. Keep distinctive features visible, and use furnishings to support their scale and materials.
Talk through the preparation plan with your real estate agent. The agent can help identify which rooms and features need to read clearly in the listing, while you decide which work suits the property’s condition and campaign. For example, if the living room feels cramped, rearranging furniture may improve flow more effectively than adding decorative pieces.